(the stop is the drop between forehead and bridge of nose)Miniature – Head strong and of good length, narrowing from ears to eyes and then gradually forward toward end of nose. Upper part of the head (occiput to the base of forehead) moderately broad between ears. Flat, creaseless forehead; well muscled but not too strongly developed cheeks. Medium stop to accentuate prominent eyebrows. Powerful muzzle ending in a moderately blunt line, with bristly, stubby moustache and chin whiskers. Ridge of nose straight and running almost parallel to extension of forehead. Nose black with wide nostrils. Lips tight but not overlapping.
The breed standard is describing the structure of the head, basically a blunt ended wedge, however the head is often described as 'brick shaped' and this is where the shaping of the beard come in, so the end of the wedge aka muzzle is paded out by the beard.
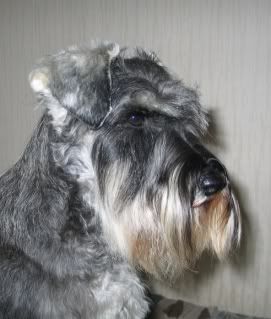
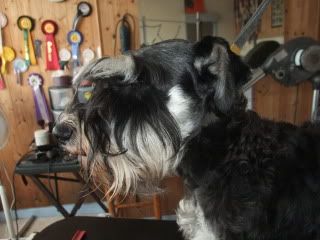
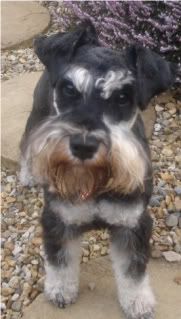
Here is my model for today, Gracie before grooming. Her beard is shorter then I like thanks to having a puppy in the house last year!!
The head and ears are usually clipped with a 10 blade (dogs with a very thick coat can take a closer blade on the ears which would bald a thinner coated dog). I tend to use a 10 on the ears and the 7f blade on the rest, using it against the coat growth, I find it gives a neater trim. For those dogs who are a little rounded across the skull, the 7f can be used to leave a little more length along the line between ear and eye to fill in the rounded corners into a sharper, squarer shape - this can be blended in with the clippers or later with the thinning scissors.
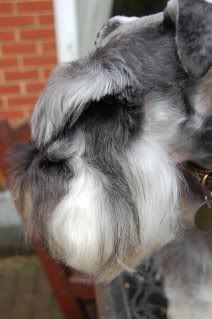
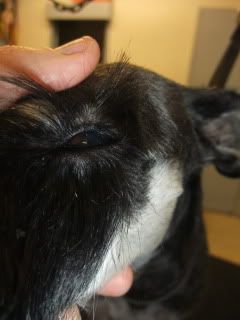
So where do we trim to? for those of you with a p/s or b/s it is fairly easy to work out the rough lines for the eyebrows, just stop as you get to the white bit! For those with blacks or whites you need to investigate a little more, get your hands on the skull and feel for the dip above the eyes, rest a thumb along that line and don't clip any further forward then this (the line may want changing a little later on, depending on head shape but for now this is a good, general line). For the cheeks, it is often recommended to stop at the black whisker, but this isn't always the right place and I usually bring the line further forward. On the photgraph below, you can see where this black whisker lies in relation to the line of the beard.
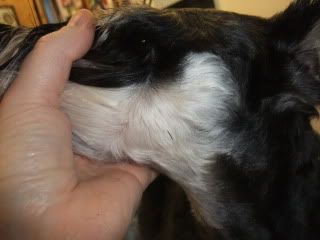
So how do I work out this line? Use a comb to separate the beard from the hair to be clipped off the cheeks, you can then hold the beard out of the way with your thumb while you trim away the excess hair. The line goes from the outside corner of the eye on a diagonal line to about a finger width behind the corner of the mouth (taking it to the corner of the mouth makes the head to terrier-like), take the same line down the opposite side of the head and then join them underneath the jaw in a curving point. The advantage to having this line a little further forward then the black whisker allows the beard to lie flatter (instead of bushing out to the sides - I think Graham mentioned this as a problem with Eddie - using lots of conditioner on the beard each time he is bathed will also help).
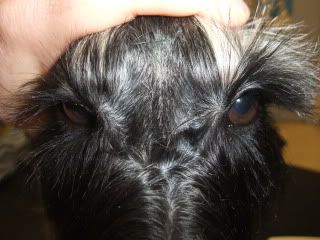
Showing the line in relation to the mouth
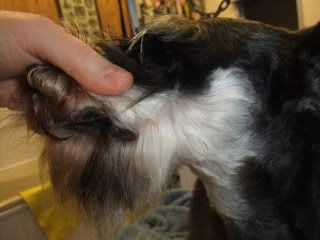
Now, there is an exception to this, IF your dog has very rounded cheeks, leaving the beard line a little further back will fill in the sides of the 'brick' at the point where the cheeks come back round towards the eyes.
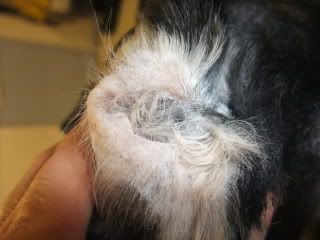
Different line used on a 'cheeky' dog, note where the black whisker is!
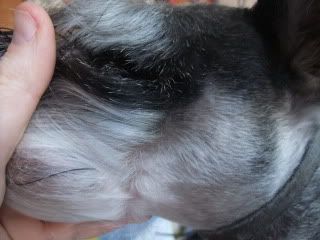
Having the beard line to far forward for your dog gives them a '8' shaped head, modelled here by Ralphy
in this case it was caused by the beard being brought in underneath the eyes, the same look can happen on a cheeky dog.
Next we trim in close to the outer corner of the eye (this stops the bushed out look a lot of schnauzers have and better defines the eyebrows.
Using a pair of small scissors, we then trim out the area between the eyebrows into a V shaped, taking great care not to trim out all of the mask infront of the inner corner of the eye, otherwise you end up with a big, white stripe down the mask which takes several months to grow back out - taking out the minimum amount of hair in the V allows the beard to lie flat under the eye and stops the constant need for trimming as the hair grows back and pokes the dog in the eye or just blocks their vision - so grow that hair out and it will not be a problem anymore.
The V
We are now left with shaping the eyebrows into a triangle, how long you take them is a personal preference, but try not to take them to short or they look like they are constantly surprised at the world! Those dogs with a nice, long head like Grace look best (IMO) with longer eyebrows, dogs with shorter heads look best with slightly shorter eyebrows (or they look in danger of being all eyebrow!). As a rough guide, aim for the eyebrows being about 3/4 the length of the muzzle, some people like to see the eyes but try not to go less then half the length of the muzzle or you are getting close to the little welsh terrier eyebrows!
(photo to follow when camera and computer are talking again!)
To make it easier, you can trim the eyebrows when damp, just beaware that dry hair tends to sit higher, so wait until dry before thinking you need to take a bit more off the length.
There are whiskers in the eyebrows and these can cause the brows to sit above the line of the skull, these can be trimmed down to allow the eyebrow to sit flatter, but this tends to be left on pet dogs.
There are several variations on eyebrows on the continent where the eyebrow isn't split in the centre, from only trimming the ends that go over the nose and leaving the rest as a 'fall' like on a wheaten terrier, so the more stylised version where the eyebrows are trimmed the same along the outercorner of the eye towards the nose to enable the dog to see out, this is a good look for dogs who have a long, narrow head.
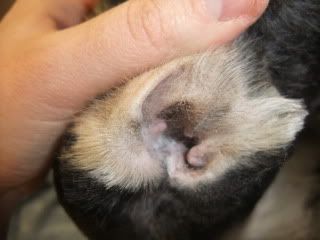
Don't forget to pluck the ears
before with the ear powder in place
after